The Magic of Peppermint Holiday Bars
As the holiday season approaches, we often find ourselves in search of delightful treats that capture the essence of winter wonder. Enter “The Magic of Peppermint Holiday Bars” – a lovely dessert that combines rich chocolate, creamy layers, and the cooling thrill of peppermint. Imagine biting into a soft, chewy bar that perfectly balances sweetness with a refreshing minty kick; each bite envelops your senses in the aroma of cocoa and peppermint. The mesmerizing sight of these bars, adorned with festive red and white stripes from crushed peppermint candies, can brighten any holiday gathering. This recipe is not only easy to make but also a fun family activity, perfect for cozy weeknights or festive gatherings with loved ones. So, get ready to learn the secrets behind these magical holiday bars and spread the joy of the season!
Understanding This Recipe
The Magic of Peppermint Holiday Bars hails from the tradition of creating sweet treats for the holiday season, drawing inspiration from classic peppermint bark and chocolate fudge. This no-fuss dessert is a festive variation that captures the same flavors in a convenient bar format. The harmonious blend of chocolate and peppermint, paired with a creamy texture that melts in your mouth, can make it a staple in your holiday recipe collection. These bars are often served at cookie exchanges, family reunions, or holiday parties, providing a delightful way to enjoy those beloved seasonal flavors.
One unique aspect of this recipe is its versatility, allowing you to elevate the flavor profile with a few simple substitutions or additions. For instance, adding crushed cookies can create a delightful crunch, while an extra layer of white chocolate drizzle enhances the visual appeal. Whether it’s for a grand holiday feast or a quiet evening at home, these bars are a gratifying treat that can be prepared in just a few steps. Plus, their eye-catching appearance makes them an excellent choice for gifting, bringing both flavor and festive charm to any occasion.
Why You’ll Love This Recipe
The Magic of Peppermint Holiday Bars is a fantastic addition to your recipe repertoire for several reasons:
Ease of Preparation: With straightforward steps and common ingredients, this recipe is approachable even for novice bakers. You’ll feel accomplished whipping up these bars in no time.
Flavor Complexity: The combination of rich chocolate and refreshing peppermint creates a mouthwatering experience, perfect for those who love seasonal flavors.
Family-Friendly or Kid-Approved: Kids adore colorful and sweet treats! These bars are not only delicious, but they also let children participate in the fun of decorating with crushed candies.
Budget-Friendly or Ingredient Flexibility: Most ingredients are pantry staples; if you don’t have peppermint extract, vanilla can work in a pinch, offering flexibility without compromising taste.
Perfect for Gifting: These bars make beautiful homemade gifts wrapped in festive paper, ideal for sharing the holiday spirit.
Your Guide to Making Peppermint Holiday Bars at Home
To create these delicious bars, you’ll only need a few essential tools and ingredients. You’ll be baking in a preheated oven, so the total prep time is about 30 minutes, plus cooling time. Now, let’s gather our tools and ingredients!
Tools Needed
- 9×13-inch baking dish
- Mixing bowls
- Hand mixer or whisk
- Measuring cups and spoons
- Spatula
Ingredients
- 1 cup granulated sugar: Sweetens the bars, giving them a delightful flavor.
- 1/2 cup unsalted butter: Adds richness and moisture.
- 2 large eggs: Acts as a binder, helping the bars hold their shape.
- 1 teaspoon vanilla extract: Provides a warm undertone that complements the chocolate.
- 1 cup all-purpose flour: Gives structure to the bars.
- 1/2 cup cocoa powder: Infuses the bars with deep chocolate flavor.
- 1 teaspoon peppermint extract: The star ingredient that brightens the flavor profile.
- 1/2 cup crushed peppermint candies: For topping, adds texture and a holiday charm.
Directions
Preheat Your Oven: Begin by preheating your oven to 350°F (175°C). The anticipation of baking often fills your kitchen with excitement!
Prepare the Pan: Grease a 9×13-inch baking dish with butter or line it with parchment paper. This ensures the bars will release easily after baking.
Mix Wet Ingredients: In a large mixing bowl, combine the granulated sugar and softened butter. Using a hand mixer or whisk, beat until the mixture is light and fluffy; this will take about 2–3 minutes, and the texture should be smooth.
Add Eggs and Flavorings: Add the eggs one at a time, mixing well after each addition. Stir in the vanilla and peppermint extracts, and feel free to indulge in the sweet aroma.
Combine Dry Ingredients: In another bowl, whisk together the flour and cocoa powder. Gradually add this to the wet mixture, stirring until just combined. The batter should be thick and luscious.
Fold in Peppermint Candies: Gently fold in half of the crushed peppermint candies, leaving the rest for topping. This adds delightful crunchy bites in every square.
Bake to Perfection: Pour the batter into the prepared baking dish and smooth the top with a spatula. Bake for 25–30 minutes, until a toothpick inserted in the center comes out with a few moist crumbs. The warm chocolate aroma will envelop your home—you’ll know they’re almost ready!
Delicious Pairings for Peppermint Holiday Bars
Serving The Magic of Peppermint Holiday Bars is a joyful experience, as they can be paired with various complementary flavors and textures. The freshness of these bars pairs beautifully with a steaming cup of hot cocoa, creating a cozy treat perfect for the cold winter nights. Alternatively, a scoop of vanilla ice cream alongside the bars offers a creamy contrast to the rich chocolate and mint flavors, enhancing the taste experience.
For another delightful option, serve them with a warm cup of spiced chai or peppermint tea; the aromatic spices of the tea will round out the flavors beautifully. Finally, consider serving them at festive gatherings, accompanied by a platter of sugar cookies or gingerbread men for a charming dessert buffet that will impress your guests.
Chef-Approved Tips for Perfecting Peppermint Holiday Bars
To achieve the perfect batch of peppermint holiday bars, consider these key techniques:
Ingredient Swaps: Feel free to substitute half the flour with almond flour for a gluten-free variation or use dark chocolate cocoa for an intense flavor.
Spice Adjustments: Add a pinch of sea salt to enhance the sweetness, or include a dash of cinnamon for a cozy, warm undertone.
Equipment Advice: Make sure your baking tin is the right size; a tin that’s too small might cause the bars to overflow.
Storage Tips: Store bars in an airtight container at room temperature for up to a week, but they can also be refrigerated for a longer shelf life.
Mistakes to Avoid: Avoid overbaking; check the bars a few minutes early to ensure a moist and chewy texture.
Variations & Add-Ins
There are plenty of creative ways to make The Magic of Peppermint Holiday Bars your own!
Nutty Touch: Add 1/2 cup of chopped nuts such as walnuts or pecans into the batter for an extra crunch and nutty flavor.
Colorful Swirls: Before baking, create a swirl effect using melted white chocolate on top; simply drizzle it over the batter and swirl it with a knife for a stunning visual.
Dietary Options: For a vegan version, replace the eggs with flax eggs and use coconut oil in place of butter to keep the rich flavor intact.
Kid-Friendly Version
If you have little ones helping in the kitchen, consider simplifying the bars for a more kid-friendly approach. You can create smaller, fun shapes using cookie cutters; this adds an element of playfulness. Use less peppermint extract to make them less intense for young taste buds, and let the kids pick their favorite toppings—think colorful sprinkles or tiny chocolate chips for extra sweetness.
Storing and Reheating Tips
Proper storage is key to keeping The Magic of Peppermint Holiday Bars fresh and delicious. Allow the bars to cool completely in the baking dish before transferring them to an airtight container. Store them at room temperature for up to a week. If you want to keep them longer, refrigerate them for about ten days, or freeze them for about a month. Just make sure to wrap the bars tightly in plastic wrap and then place them in a freezer-safe container or bag to prevent freezer burn.
When you’re ready to enjoy them again, simply thaw the bars overnight in the refrigerator and let them come to room temperature on the counter for about 30 minutes before serving. If you prefer them warm, try reheating in the microwave for about 10-15 seconds or pop them in a warm oven (around 300°F) for about 5 minutes. This brings back their chewy texture and enhances the smell of chocolate and mint that fills your home once more.
FAQs
Q: Can I make the bars ahead of time?
Absolutely! These bars can be made a few days ahead. Store them in an airtight container and keep them at room temperature or in the fridge.
Q: How do I substitute ingredients for dietary restrictions?
If you need to make these bars gluten-free, use a 1:1 gluten-free flour blend. For vegan variations, substitute eggs with flax eggs and replace butter with coconut oil.
Q: Can I freeze these bars?
Yes, you can freeze the bars! Just wrap them tightly in plastic wrap and then in foil or a freezer-safe bag. They can last up to a month in the freezer.
Q: How long do these bars stay fresh?
Stored properly, they will last for a week at room temperature and up to ten days in the fridge.
Q: What can I use instead of crushed peppermint candies?
If you don’t have peppermint candies, you can use chocolate chips or crushed chocolate-covered peppermint candies as a lovely substitute.
In conclusion, The Magic of Peppermint Holiday Bars is the essence of holiday spirit wrapped in a delicious bite. Their cheerful colors and delightful flavors make them a perfect addition to your seasonal celebrations, whether you’re giving them as gifts, bringing them to a potluck, or enjoying them at home with family. Try it tonight and let me know how it turned out!

The Magic of Peppermint Holiday Bars
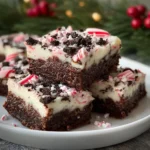
Delightful peppermint holiday bars combining rich chocolate and creamy layers, adorned with crushed peppermint candies for a festive touch.
- Prep Time: 30 minutes
- Cook Time: 30 minutes
- Total Time: 60 minutes
- Yield: 12 servings 1x
- Category: Dessert
- Method: Baking
- Cuisine: American
- Diet: Vegetarian
Ingredients
- 1 cup granulated sugar
- 1/2 cup unsalted butter
- 2 large eggs
- 1 teaspoon vanilla extract
- 1 cup all-purpose flour
- 1/2 cup cocoa powder
- 1 teaspoon peppermint extract
- 1/2 cup crushed peppermint candies
Instructions
- Preheat your oven to 350°F (175°C).
- Grease a 9×13-inch baking dish with butter or line it with parchment paper.
- In a large mixing bowl, combine the granulated sugar and softened butter. Beat until light and fluffy (2–3 minutes).
- Add the eggs, one at a time, mixing well after each addition. Stir in the vanilla and peppermint extracts.
- In another bowl, whisk together the flour and cocoa powder. Gradually add this to the wet mixture, stirring until just combined.
- Gently fold in half of the crushed peppermint candies, reserving the rest for topping.
- Pour the batter into the prepared baking dish and smooth the top with a spatula.
- Bake for 25–30 minutes, until a toothpick inserted in the center comes out with a few moist crumbs.
Notes
Store bars in an airtight container at room temperature for up to a week. Can be refrigerated for a longer shelf life.
Nutrition
- Serving Size: 1 bar
- Calories: 250
- Sugar: 20g
- Sodium: 120mg
- Fat: 10g
- Saturated Fat: 5g
- Unsaturated Fat: 4g
- Trans Fat: 0g
- Carbohydrates: 35g
- Fiber: 2g
- Protein: 3g
- Cholesterol: 30mg
Keywords: peppermint, holiday dessert, bars, baking, festive treats