Homemade Cheesy Breadsticks: A Delightful Treat for Everyone
Imagine the moment you pull a tray of Homemade Cheesy Breadsticks from the oven. The golden brown crust glistens under the kitchen light, while the tantalizing aroma envelopes your home, making everyone rush to the kitchen. As you tear into one, the cheesy, gooey interior stretches invitingly, and you can’t help but take a bite. The buttery richness, enhanced by the warm flavors of garlic and herbs, dances on your taste buds, creating a comforting embrace. Not only are these breadsticks easy to prepare, but they also promise to become a beloved staple for cozy weeknights or cheerful gatherings. Whether served as a side dish or a decadent snack, I invite you to try these breadsticks and enjoy the joy they bring to your table.
Understanding this Recipe
Homemade Cheesy Breadsticks have roots in Italian cuisine, reminiscent of traditional focaccia or pizza bread. These delightful bites have evolved to suit various palates, featuring ooey-gooey cheese melted into a dough that is both soft and crispy. You might find these cheesy wonders at your favorite pizzeria or family restaurant, but making them from scratch allows you to control the flavor and ingredients, creating an aromatic and scrumptious experience right at home. The beauty of this dish is that it can be made in various ways; whether baked in the oven, prepared in an air fryer, or even cooked in a skillet, each method provides a unique texture and flavor allowing for versatility that appeals to many.
Baking Homemade Cheesy Breadsticks is perfect for any occasion, be it a festive gathering, movie night, or just a regular family dinner. They can be served alongside marinara sauce for dipping or enjoyed on their own as a delicious snack. Fun fact: Did you know that homemade breadsticks have been a family favorite for generations? The simple process allows everyone to get involved, from dough kneading to topping the breadsticks with cheese and spices, creating a fun activity that brings the family together.
Why You’ll Love This Recipe
Homemade Cheesy Breadsticks truly stand out for numerous reasons that make them irresistible.
Ease of Preparation: This recipe is straightforward, requiring just a few simple ingredients that you likely already have in your pantry.
Flavor Complexity: The aromatic blend of garlic, butter, and herbs paired with the melty cheese creates a rich and satisfying flavor that keeps you coming back for more.
Family-Friendly: Everyone, from toddlers to adults, loves cheesy breadsticks, making them the perfect addition to any family meal.
Budget-Friendly: The ingredients needed are minimal and affordable, allowing you to whip up this treat without breaking the bank.
Ingredient Flexibility: You can easily substitute different types of cheese or spices to suit your taste preferences or dietary needs.
How to Make Homemade Cheesy Breadsticks
Making these breadsticks at home is both fun and easy! You’ll need a few basic tools like a mixing bowl, a baking sheet, and a spatula. The whole process takes about 30-40 minutes, from mixing to baking.
Ingredients
2 cups all-purpose flour: Provides the base structure; consider using whole wheat for a healthier twist.
1 cup warm water: Activates the yeast; too hot can kill the yeast, too cold will not activate it.
1 tablespoon sugar: Feeds the yeast, promoting a good rise.
1 packet (2¼ teaspoons) instant yeast: Must be fresh for the best rise.
½ teaspoon salt: Enhances flavor and strengthens the dough.
2 tablespoons olive oil: Adds moisture and richness to the dough.
1 cup shredded mozzarella cheese: The star ingredient that adds that gooey cheese pull.
2 tablespoons garlic powder: Provides an irresistible savory flavor, perfect for garlic lovers.
2 tablespoons unsalted butter: Adds richness and helps achieve that golden-brown crust.
Directions
Activate the Yeast: In a small bowl, combine the warm water, sugar, and yeast. Let it sit for about 5-10 minutes until it becomes frothy.
Mix the Dry Ingredients: In a large mixing bowl, whisk together the flour and salt, ensuring an even distribution.
Combine Wet and Dry Ingredients: Pour the yeast mixture and olive oil into the flour mixture. Stir with a wooden spoon until the dough begins to come together.
Knead the Dough: On a lightly floured surface, knead the dough for about 5 minutes until it is smooth and elastic. It should feel slightly tacky but not sticky.
First Rise: Place the kneaded dough in a lightly oiled bowl, cover it with a clean kitchen towel, and let it rise in a warm spot for about 20-30 minutes, or until doubled in size.
Shape the Breadsticks: After the rise, punch down the dough and roll it out into a rectangle about ½-inch thick. Cut into strips using a pizza cutter or knife.
Add Cheese and Bake: Place the strips on a greased baking sheet, sprinkle with mozzarella cheese, garlic powder, and drizzle melted butter on top. Preheat your oven to 375°F (190°C) and bake for about 15-20 minutes until golden brown.
What to Serve With Homemade Cheesy Breadsticks
These warm, cheesy delights are incredibly versatile when it comes to pairing. They work beautifully alongside pasta dishes, providing a delightful contrast of textures with the carbs and cheese. The buttery richness of the breadsticks complements tangy marinara sauce perfectly, making each dip a flavorful bite. For a lighter meal, consider serving them with a crisp garden salad, where the freshness of the vegetables balances the indulgence of the breadsticks. You can even pair these cheesy treats with a glass of red or white wine, elevating any meal into a special occasion.
Pro Tips for the Best Homemade Cheesy Breadsticks
Technique is essential to ensure your Homemade Cheesy Breadsticks come out perfectly:
Ingredient Swaps: Experiment with different cheeses like cheddar or pepper jack for a spicy twist.
Spice Adjustments: Feel free to sprinkle some Italian seasoning or crushed red pepper flakes for added flavor.
Equipment Advice: Using a stone baking sheet can help achieve that perfect crispy bottom.
Storage Tips: Store leftovers in an airtight container for up to three days to keep them fresh.
Mistakes to Avoid: Ensure your yeast is fresh; expired yeast can lead to flat breadsticks.
Variations & Add-Ins
You can easily create variations of these Homemade Cheesy Breadsticks to suit your taste. Adding cooked herbs, like rosemary or thyme, to the dough will give it an aromatic boost. For a spicy kick, incorporate diced jalapeños or chili flakes before baking. If you’re feeling adventurous, try topping your breadsticks with a mix of cheeses such as feta and parmesan—this not only alters the flavor but also creates an appealing visual appeal.
Kid-Friendly Version
To make these breadsticks more appealing to children, consider using fun shapes instead of traditional strips; use cookie cutters for star or heart shapes! Additionally, allowing kids to help sprinkle cheese and toppings makes it a fun and interactive experience. You can also reduce the garlic powder’s quantity and opt for milder cheese options to cater to picky eaters.
Storing and Reheating Tips
For those delicious Homemade Cheesy Breadsticks that might be left over, proper storage is key. Place them in an airtight container, preferably lined with paper towels to absorb any excess moisture, and store them in the refrigerator for up to three days. If you know you’ll have leftovers, consider slicing them before storing, making it easier to reheat as needed.
When it comes to reheating, the oven is your best bet for retaining the crispiness of your breadsticks. Preheat your oven to 350°F (175°C), wrap the breadsticks in aluminum foil, and heat for about 10-15 minutes until warm. You can also utilize an air fryer for about 3-5 minutes, which provides that freshly baked texture. If you freeze the breadsticks, allow them to cool completely before wrapping them tightly. They should be consumed within three months. Thaw overnight in the refrigerator and reheat as mentioned above to enjoy them at their best.
FAQs
Q: Can I make the dough ahead of time?
A: Absolutely! You can prepare the dough up to the rising stage, then cover it and store it in the refrigerator overnight. Just allow it to come to room temperature before shaping.
Q: What can I substitute if I don’t have mozzarella?
A: Other melty cheeses like provolone, Gouda, or even a blend would work wonderfully. Each cheese option will slightly change the flavor profile.
Q: How can I make these breadsticks dairy-free?
A: Use a dairy-free cheese alternative and replace the butter with a plant-based margarine to achieve similar flavors without dairy.
Q: Can I add toppings to the breadsticks?
A: Definitely! Some great options include pepperoni slices, fresh herbs, or even spinach for those looking to add some greens to their snack.
Q: What’s the best way to freeze the breadsticks?
A: Allow them to cool, then wrap each breadstick tightly in plastic wrap, followed by aluminum foil for added protection. This helps maintain their flavor and moisture.
Conclusion
You’re now equipped to create your own Homemade Cheesy Breadsticks—a dish that is not only deliciously satisfying but also brings warmth and joy to your home. They’re perfect for any occasion, and with the ease of preparation, you’ll find them becoming a family staple. I can’t wait for you to try this recipe tonight and see the smiles it brings to your table! Let me know how it turned out!

Homemade Cheesy Breadsticks
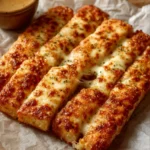
Delicious, gooey, and golden brown Homemade Cheesy Breadsticks perfect for any occasion.
- Prep Time: 10 minutes
- Cook Time: 20 minutes
- Total Time: 30 minutes
- Yield: 4 servings 1x
- Category: Appetizer
- Method: Baking
- Cuisine: Italian
- Diet: Vegetarian
Ingredients
- 2 cups all-purpose flour
- 1 cup warm water
- 1 tablespoon sugar
- 1 packet (2¼ teaspoons) instant yeast
- ½ teaspoon salt
- 2 tablespoons olive oil
- 1 cup shredded mozzarella cheese
- 2 tablespoons garlic powder
- 2 tablespoons unsalted butter
Instructions
- Activate the Yeast: In a small bowl, combine the warm water, sugar, and yeast. Let it sit for about 5-10 minutes until it becomes frothy.
- Mix the Dry Ingredients: In a large mixing bowl, whisk together the flour and salt, ensuring an even distribution.
- Combine Wet and Dry Ingredients: Pour the yeast mixture and olive oil into the flour mixture. Stir with a wooden spoon until the dough begins to come together.
- Knead the Dough: On a lightly floured surface, knead the dough for about 5 minutes until it is smooth and elastic.
- First Rise: Place the kneaded dough in a lightly oiled bowl, cover it with a clean kitchen towel, and let it rise in a warm spot for about 20-30 minutes, or until doubled in size.
- Shape the Breadsticks: After the rise, punch down the dough and roll it out into a rectangle about ½-inch thick. Cut into strips using a pizza cutter or knife.
- Add Cheese and Bake: Place the strips on a greased baking sheet, sprinkle with mozzarella cheese, garlic powder, and drizzle melted butter on top. Preheat your oven to 375°F (190°C) and bake for about 15-20 minutes until golden brown.
Notes
Store leftovers in an airtight container for up to three days. Reheat in the oven or air fryer for best results.
Nutrition
- Serving Size: 1 breadstick
- Calories: 250
- Sugar: 1g
- Sodium: 450mg
- Fat: 11g
- Saturated Fat: 5g
- Unsaturated Fat: 6g
- Trans Fat: 0g
- Carbohydrates: 30g
- Fiber: 1g
- Protein: 8g
- Cholesterol: 20mg
Keywords: breadsticks, cheesy, Italian, appetizer